Twitter? Garbage. Facebook? Garbage. Do you enjoy having your data harvested and sold? No? Good. Back in the day, there was this thing called Internet Relay Chat. What if I told you… It still exists! Internet socializing without all the Silicon Valley data theft! But due to how the ecosystem works, any time you’re not actively connected to the server, you don’t receive any messages. This means that you don’t get to see conversations that happen while you’re offline, even if somebody mentions you!
Enter the IRC Bouncer. This nifty little piece of software sits behind the scenes and stays connected to the IRC server(s) whilst you’re sleeping, working or doing other things that happen IRL. Then when you return to where you’re supposed to be (i.e. in front of a computer) you reconnect and the bouncer greets you with a flood of glorious, nerdy conversations.
Assumptions
- You know why HTTPS is necessary and will use it
- You understand the general working of containers and have docker installed on your system. (Docker/Docker Compose knowledge is a plus but not required, you can basically just copy/paste code to get this working.)
- Your domain/subdomain has a CAA record that supports LetsEncrypt
You Will Need
- A linux environment - or WSL
I guess, if you hate yourself…which is actually pretty good now - Docker
- Docker-compose
- An A record pointed at your environment’s public IP (for LetsEncrypt to validate the SSL cert)
- Your caffeinated beverage of choice
1 - Checking Your Install
See Step 1 from this post for further version instructions. The short of it is that I’m using docker 19.03.1 and docker-compose 1.21.0.
2 - Generate a Basic ZNC Config
As per usual, we’re using a reverse proxy for this component so if you’re not using that, you can either ignore those particular parts or you can set that sucker up using the instructions in this post. The config is also on GitHub.
Before we compose all the things, we first have to generate the base ZNC config. If you’re migrating from an old install, just migrate the whole znc folder to /var/lib/docker/volumes/YOURVOLUMENAME/_data/.
2.1 - Generate Config
Run docker run -it -v znc_znc_data:/znc-data znc --makeconf then follow the process through like the below (you should customize your username, nicks, ident and bind host though).
[ .. ] Checking for list of available modules...
[ ** ]
[ ** ] -- Global settings --
[ ** ]
[ ?? ] Listen on port (1025 to 65534): 6697
[ ?? ] Listen using SSL (yes/no) [no]: yes
[ .. ] Verifying the listener...
[ ** ] Unable to locate pem file: [/znc-data/znc.pem], creating it
[ .. ] Writing Pem file [/znc-data/znc.pem]...
[ ** ] Enabled global modules [webadmin]
[ ** ]
[ ** ] -- Admin user settings --
[ ** ]
[ ?? ] Username (alphanumeric): yournamehere
[ ?? ] Enter password: nicensecure
[ ?? ] Confirm password: nicensecure
[ ?? ] Nick [yournamehere]: yournickhere
[ ?? ] Alternate nick [yournamehere_]: youraltnickhere
[ ?? ] Ident [yournamehere]: youridenthere
[ ?? ] Real name (optional): yourmeatspacenamehere
[ ?? ] Bind host (optional): leavethisblankit\'spointless
[ ** ] Enabled user modules [chansaver, controlpanel]
[ ** ]
[ ?? ] Set up a network? (yes/no) [yes]: no
[ ** ]
[ .. ] Writing config [/znc-data/configs/znc.conf]...
[ ** ]
[ ** ] To connect to this ZNC you need to connect to it as your IRC server
[ ** ] using the port that you supplied.  You have to supply your login info
[ ** ] as the IRC server password like this: user/network:pass.
[ ** ]
[ ** ] Try something like this in your IRC client...
[ ** ] /server <znc_server_ip> +6697 yournamehere:<pass>
[ ** ]
[ ** ] To manage settings, users and networks, point your web browser to
[ ** ] https://<znc_server_ip>:6697/
[ ** ]
[ ?? ] Launch ZNC now? (yes/no) [yes]: no
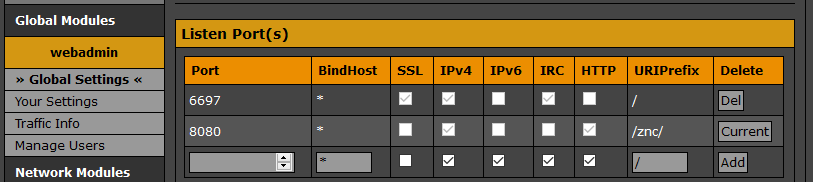
2.2 - Add a Listener to ZNC
You can do this in 1 of 2 ways:
Log into the webadmin GUI, go to the Global Settings section and add the listener there.
Edit the config directly with
vim /var/lib/docker/volumes/YOURVOLUMENAME/_data/configs/znc.conf
<Listener listener0>
        AllowIRC = true
        AllowWeb = false
        IPv4 = true
        IPv6 = false
        Port = 6697
        SSL = true
        URIPrefix = /
</Listener>

<Listener listener1>
        AllowIRC = false
        AllowWeb = true
        IPv4 = true
        IPv6 = false
        Port = 8080
        SSL = false
        URIPrefix = /znc/
</Listener>
The listeners basically operate thusly: one is for the actual IRC network connections and one is for the webadmin frontend. We only need to reverse proxy the web GUI port, and that’s the only easy one to do with Traefik. The ZNC Wiki has some opinions on using NGINX for that purpose but I haven’t tried it so your mileage may vary. I don’t really see the extra benefits of reverse proxying the IRC connection but maybe I will have my eyes opened in the future, at which point I’ll update this post. Also, you can use whatever port you like for the web listener, we’re going to forward that from 443 -> containerPort by Traefik so as long as you’re consistent then you’re alright.
2.3 Make a Compose File and Add Traefik Container Labels
Because we’re not animals who just run containers with a command and then leave, we need to pop this into a docker-compose.yml file. As per the general Traefik config, we have to add the labels to our ZNC container so that our traffic gets routed properly.
version: "3"

services:
  znc:
    container_name: znc
    image: znc:1.8.0
    restart: unless-stopped
    ports:
      - 6697:6697
    labels:
      - "traefik.enable=true"
      # Web Frontend Rules
      - "traefik.http.routers.znc.entrypoints=https"
      - "traefik.http.routers.znc.rule=Host(`sub.domain.tld`)"
      - "traefik.http.routers.znc.tls.certresolver=le"
      - "traefik.http.services.znc.loadbalancer.server.port=8080"
    volumes:
      - znc_data:/znc-data
    networks:
      - traefik_proxy

volumes:
  znc_data:

networks:
  traefik_proxy:
    external: true
This one’s pretty simple, all in all. Because we’re not reverse proxying the IRC connection, this is just a case of adding your domain to the Host rule so that the container gets an SSL cert and using the correct port in the loadbalancer section (make it the same as the one from the listener above and you’ll be fine). Oh and make sure to reference your Traefik proxy network as external (you definitely created one of those, right?).
3 - Extract The Certs From Traefik
The above will get you up and running with a cert, but at the moment the ZNC config is simply pointing to the znc.pem file that it created way back in step 2.1. If you look in your znc.conf file, you’ll see these sections right at the top (the cert names may be different, I’m not creating this from scratch just to get that detail right… the options are what’s important):
SSLCertFile = /znc-data/certificate.pem
SSLDHParamFile = /znc-data/dhparam.pem
SSLKeyFile = /znc-data/privatekey.pem
You’ll notice, if you go and have a look at your Traefik data volume, that all you have in there is an acme.json file. This file is where Traefik keeps all your certs, but ZNC won’t read such a file as it’s looking for .pem files.
Enter traefik-certs-dumper (referred to henceforth as TCD for brevity). This is a really neat container that you can just add to your Traefik docker-compose.yml file in order to export the certificates as their own separate files. This will mean all we have to do is copy 2 of those and ZNC will work nicely.
traefik-certs-dumper:
  image: ldez/traefik-certs-dumper:v2.7.0
  entrypoint: sh -c 'traefik-certs-dumper file --version v2 --domain-subdir --crt-ext=.pem --key-ext=.pem --watch --source /data/acme.json --dest /data/certs/'
  labels:
    - "traefik.enable=false"
  volumes:
    - "certs:/data"
As per usual, specify a version. If this gets a breaking change, it has the potential to affect Traefik, which will affect every container that you’re reverse proxying, so be careful when upgrading. Read the changelog. One key here is that the volume that TCD uses must be the same as Traefik. This is because they need to access the same data (that acme.json file), so there’s no point creating a new volume and copying it across.
I’ve tweaked the entrypoint command here from a few tries at this with the various options from the README file in the repo.
--version v2 tells TCD that we’re using Traefik v2.
--domain-subdir tells TCD to put the certs in differnt directories based on the host subdomain. This will make the right files easy to find and also easier to script when I eventually get around to doing that.
--cert-ext=.pem and --key-ext=.pem just gets us the files in the format that we want, saves conversion after the fact.
--watch tells TCD to watch the JSON file for new certs and for cert updates which saves us the trouble of restarting the container ever.
Obviously --source and --dest tell TCD where to look for the JSON file and where to dump the cert files. The repo README seemed to prefer the /data location so that’s just where I mapped my volume and therefore, where the certs will go. You could always map a separate volume for the --dest if you liked.
3.1 Give ZNC The Certs
Now, once you add this to your docker-compose.yml and bring it up, you’ll notice a bunch of subdirectories in your --dest directory. The below is truncated for brevity.
.
├── [-rw------- 117K]  acme.json
└── [drwxr-xr-x 4.0K]  certs
    ├── [drwxr-xr-x 4.0K]  sub.domain.1
    │   ├── [-rw-r--r-- 3.8K]  certificate.pem
    │   └── [-rw------- 3.2K]  privatekey.pem
    ├── [drwxr-xr-x 4.0K]  sub.domain.2
    │   ├── [-rw-r--r-- 3.8K]  certificate.pem
    │   └── [-rw------- 3.2K]  privatekey.pem
    ├── [drwxr-xr-x 4.0K]  sub.domain.2
    │   ├── [-rw-r--r-- 3.8K]  certificate.pem
    │   └── [-rw------- 3.2K]  privatekey.pem
    ├── [drwxr-xr-x 4.0K]  private
    │   └── [-rw------- 3.2K]  letsencrypt.pem
All you have to do is copy the relevant .pem files over to the root of the ZNC volume. Make sure that the filename of the certs matches the entry in your znc.conf and you should be good to go. At some point in the future I’ll be taking advantage of the --post-hook option in order to have this magically copy whenever our cert is renewed but that’s an issue for another post.
Small warning here, leave the private folder alone, it’s what Traefik uses to authenticate you to LetsEncrypt. You don’t really have a need to use that so ignore it, ‘kay?
4 - This Ain’t Your Grandaddy’s Chat System
Now we need to bring it all together. As per the normal process, run docker-compose up -d for the magic to get underway.
If you’re monitoring the Traefik logs, you’ll see it pick up the new container event and obtain the SSL certificates. If you’re not, give it 10 seconds or so and then open a web browser to the domain you’ve used.
Now sign in, add a network and get to connecting! Any further details can be found on the ZNC wiki which is pretty comprehensive.
My full ZNC docker-compose.yml file:
version: "3"

services:
  znc:
    container_name: znc
    image: znc:1.8.0
    restart: unless-stopped
    ports:
      - 6697:6697
    labels:
      - "traefik.enable=true"
      # Web Frontend Rules
      - "traefik.http.routers.znc.entrypoints=https"
      - "traefik.http.routers.znc.rule=Host(`sub.domain.tld`)"
      - "traefik.http.routers.znc.tls.certresolver=le"
      - "traefik.http.services.znc.loadbalancer.server.port=8080"
    volumes:
      - znc_data:/znc-data
    networks:
      - traefik_proxy

volumes:
  znc_data:

networks:
  traefik_proxy:
    external: true
My full Traefik + TCD docker-compose.yml file:
version: "3.3"

services:
  traefik:
    container_name: traefik
    image: traefik:v2.2.0
    command:
      #- --log.level=DEBUG
      # Entrypoints
      - --entrypoints.http.address=:80
      - --entrypoints.https.address=:443
      # Provider Info
      - --providers.docker
      # Certificate Resolver Info
      - --certificatesresolvers.le.acme.email=your@domain.tld
      - --certificatesresolvers.le.acme.storage=/letsencrypt/acme.json
      - --certificatesresolvers.le.acme.tlschallenge=true
    labels:
      # Middleware Redirect
      - "traefik.http.middlewares.https-redirect.redirectscheme.scheme=https"
      # Global HTTP -> HTTPS Redirect
      - "traefik.http.routers.redirs.rule=hostregexp(`{host:.+}`)"
      - "traefik.http.routers.redirs.entrypoints=http"
      - "traefik.http.routers.redirs.middlewares=https-redirect"
    ports:
      - "80:80"
      - "443:443"
    volumes:
      - "/var/run/docker.sock:/var/run/docker.sock"
      - "certs:/letsencrypt"
    restart: unless-stopped
    networks:
      - proxy

  traefik-certs-dumper:
    image: ldez/traefik-certs-dumper:v2.7.0
    entrypoint: sh -c 'traefik-certs-dumper file --version v2 --domain-subdir --crt-ext=.pem --key-ext=.pem --watch --source /data/acme.json --dest /data/certs/'
    labels:
      - "traefik.enable=false"
    volumes:
      - "certs:/data"

volumes:
  certs:

networks:
  proxy:
    driver: bridge